


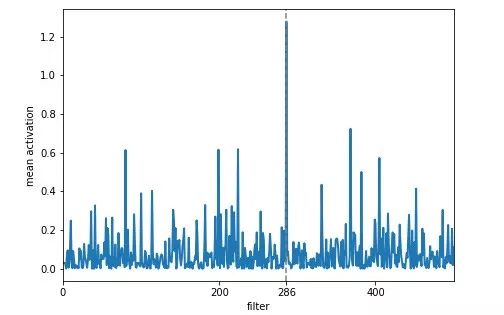


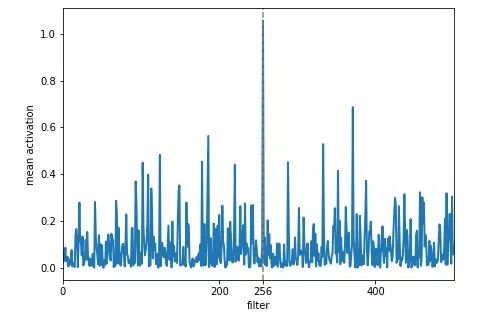


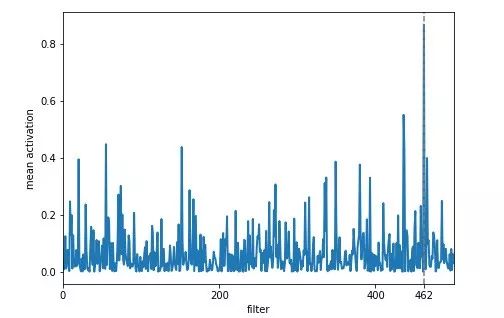


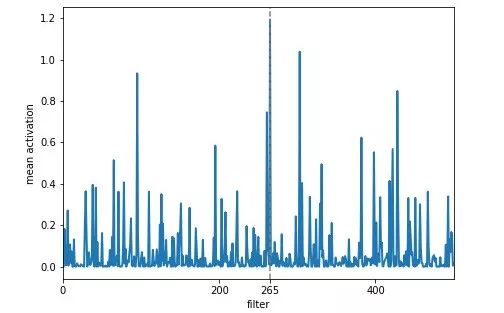


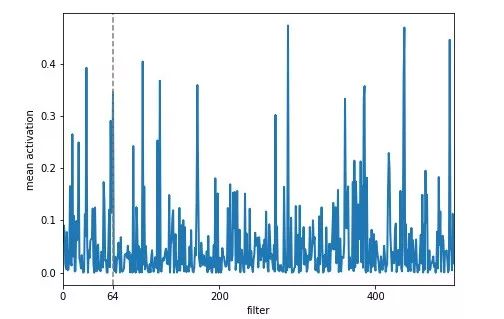


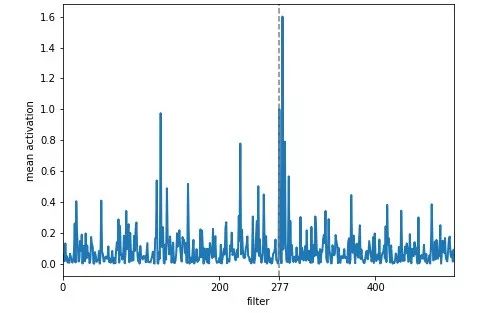

-
从随机图像开始;
-
评估模式下的预训练网络;
-
一种访问我们感兴趣的任何隐藏层激活函数的方式;
-
用于计算渐梯度的损失函数和用于更新像素值的优化器。
<section style="box-sizing: border-box;padding: 0.5em;font-size: 14px;color: rgb(169, 183, 198);line-height: 18px;border-radius: 0px;background: rgb(40, 43, 46);font-family: Consolas, Inconsolata, Courier, monospace;display: block;overflow-x: auto;letter-spacing: 0px;margin-left: 8px;margin-right: 8px;overflow-wrap: normal !important;word-break: normal !important;overflow-y: auto !important;">img = np.uint8(np.random.uniform(<span style="box-sizing: border-box;font-size: inherit;color: rgb(174, 135, 250);line-height: inherit;word-wrap: inherit !important;word-break: inherit !important;">150</span>, <span style="box-sizing: border-box;font-size: inherit;color: rgb(174, 135, 250);line-height: inherit;word-wrap: inherit !important;word-break: inherit !important;">180</span>, (sz, sz, <span style="box-sizing: border-box;font-size: inherit;color: rgb(174, 135, 250);line-height: inherit;word-wrap: inherit !important;word-break: inherit !important;">3</span>)))/<span style="box-sizing: border-box;font-size: inherit;color: rgb(174, 135, 250);line-height: inherit;word-wrap: inherit !important;word-break: inherit !important;">255</span> </section><section style="box-sizing: border-box;padding: 0.5em;font-size: 14px;color: rgb(169, 183, 198);line-height: 18px;border-radius: 0px;background: rgb(40, 43, 46);font-family: Consolas, Inconsolata, Courier, monospace;display: block;overflow-x: auto;letter-spacing: 0px;margin-left: 8px;margin-right: 8px;overflow-wrap: normal !important;word-break: normal !important;overflow-y: auto !important;"> img_var = V(img[None], requires_grad=True) </section><section style="box-sizing: border-box;padding: 0.5em;font-size: 14px;color: rgb(169, 183, 198);line-height: 18px;border-radius: 0px;background: rgb(40, 43, 46);font-family: Consolas, Inconsolata, Courier, monospace;display: block;overflow-x: auto;letter-spacing: 0px;margin-left: 8px;margin-right: 8px;overflow-wrap: normal !important;word-break: normal !important;overflow-y: auto !important;">model = vgg16(pre=True).eval()<br style="box-sizing: border-box;font-size: inherit;color: inherit;line-height: inherit;word-wrap: inherit !important;word-break: inherit !important;" />set_trainable(model, False).</section>-
PyTorch Module 是所有神经网络模块的基本类;
-
我们的神经网络的每个层都是一个 Module ;
-
每个 Module 都有一个称为 forward 的方法,当给 Module 一个输入时它会计算输出。
<section style="box-sizing: border-box;padding: 0.5em;font-size: 14px;color: rgb(169, 183, 198);line-height: 18px;border-radius: 0px;background: rgb(40, 43, 46);font-family: Consolas, Inconsolata, Courier, monospace;display: block;overflow-x: auto;letter-spacing: 0px;margin-left: 8px;margin-right: 8px;overflow-wrap: normal !important;word-break: normal !important;overflow-y: auto !important;"><span style="box-sizing: border-box;font-size: inherit;color: inherit;line-height: inherit;word-wrap: inherit !important;word-break: inherit !important;"><span style="line-height: inherit;word-wrap: inherit !important;word-break: inherit !important;">class</span> <span style="line-height: inherit;word-wrap: inherit !important;word-break: inherit !important;">SaveFeatures</span>():<br style="box-sizing: border-box;font-size: inherit;color: inherit;line-height: inherit;word-wrap: inherit !important;word-break: inherit !important;" /> <span style="line-height: inherit;word-wrap: inherit !important;word-break: inherit !important;">def</span> <span style="line-height: inherit;word-wrap: inherit !important;word-break: inherit !important;">__init__</span>(<span style="line-height: inherit;word-wrap: inherit !important;word-break: inherit !important;">self</span>, <span style="line-height: inherit;word-wrap: inherit !important;word-break: inherit !important;">module</span>):<br style="box-sizing: border-box;font-size: inherit;color: inherit;line-height: inherit;word-wrap: inherit !important;word-break: inherit !important;" /> <span style="line-height: inherit;word-wrap: inherit !important;word-break: inherit !important;">self</span>.<span style="line-height: inherit;word-wrap: inherit !important;word-break: inherit !important;">hook</span> </span>= <span style="box-sizing: border-box;font-size: inherit;color: rgb(248, 35, 117);line-height: inherit;word-wrap: inherit !important;word-break: inherit !important;">module</span>.register_forward_hook(self.hook_fn)<br style="box-sizing: border-box;font-size: inherit;color: inherit;line-height: inherit;word-wrap: inherit !important;word-break: inherit !important;" /> def hook_fn(self, <span style="box-sizing: border-box;font-size: inherit;color: rgb(248, 35, 117);line-height: inherit;word-wrap: inherit !important;word-break: inherit !important;">module</span>, input, output):<br style="box-sizing: border-box;font-size: inherit;color: inherit;line-height: inherit;word-wrap: inherit !important;word-break: inherit !important;" /> self.features = torch.tensor(output,requires_grad=True).cuda()<br style="box-sizing: border-box;font-size: inherit;color: inherit;line-height: inherit;word-wrap: inherit !important;word-break: inherit !important;" /> def close(self):<br style="box-sizing: border-box;font-size: inherit;color: inherit;line-height: inherit;word-wrap: inherit !important;word-break: inherit !important;" /> self.hook.remove()</section><section style="box-sizing: border-box;padding: 0.5em;font-size: 14px;color: rgb(169, 183, 198);line-height: 18px;border-radius: 0px;background: rgb(40, 43, 46);font-family: Consolas, Inconsolata, Courier, monospace;display: block;overflow-x: auto;letter-spacing: 0px;margin-left: 8px;margin-right: 8px;overflow-wrap: normal !important;word-break: normal !important;overflow-y: auto !important;">activations = SaveFeatures(list(self.model.children())[i])</section><section style="box-sizing: border-box;padding: 0.5em;font-size: 14px;color: rgb(169, 183, 198);line-height: 18px;border-radius: 0px;background: rgb(40, 43, 46);font-family: Consolas, Inconsolata, Courier, monospace;display: block;overflow-x: auto;letter-spacing: 0px;margin-left: 8px;margin-right: 8px;overflow-wrap: normal !important;word-break: normal !important;overflow-y: auto !important;">loss = -activations.features[<span style="box-sizing: border-box;font-size: inherit;color: rgb(174, 135, 250);line-height: inherit;word-wrap: inherit !important;word-break: inherit !important;">0</span>, j].mean()</section><section style="box-sizing: border-box;padding: 0.5em;font-size: 14px;color: rgb(169, 183, 198);line-height: 18px;border-radius: 0px;background: rgb(40, 43, 46);font-family: Consolas, Inconsolata, Courier, monospace;display: block;overflow-x: auto;letter-spacing: 0px;margin-left: 8px;margin-right: 8px;overflow-wrap: normal !important;word-break: normal !important;overflow-y: auto !important;">optimizer = torch.optim.Adam([img_var], lr=lr, weight_decay=<span style="box-sizing: border-box;font-size: inherit;color: rgb(174, 135, 250);line-height: inherit;word-wrap: inherit !important;word-break: inherit !important;">1e-6</span>)</section>


<section style="box-sizing: border-box;padding: 0.5em;font-size: 14px;color: rgb(169, 183, 198);line-height: 18px;border-radius: 0px;background: rgb(40, 43, 46);font-family: Consolas, Inconsolata, Courier, monospace;display: block;overflow-x: auto;letter-spacing: 0px;margin-left: 8px;margin-right: 8px;overflow-wrap: normal !important;word-break: normal !important;overflow-y: auto !important;"><span style="box-sizing: border-box;font-size: inherit;color: inherit;line-height: inherit;word-wrap: inherit !important;word-break: inherit !important;"><span style="line-height: inherit;word-wrap: inherit !important;word-break: inherit !important;">class</span> <span style="line-height: inherit;word-wrap: inherit !important;word-break: inherit !important;">FilterVisualizer</span>():<br style="box-sizing: border-box;font-size: inherit;color: inherit;line-height: inherit;word-wrap: inherit !important;word-break: inherit !important;" /> <span style="line-height: inherit;word-wrap: inherit !important;word-break: inherit !important;">def</span> <span style="line-height: inherit;word-wrap: inherit !important;word-break: inherit !important;">__init__</span>(<span style="line-height: inherit;word-wrap: inherit !important;word-break: inherit !important;">self</span>, <span style="line-height: inherit;word-wrap: inherit !important;word-break: inherit !important;">size</span></span>=<span style="box-sizing: border-box;font-size: inherit;color: rgb(174, 135, 250);line-height: inherit;word-wrap: inherit !important;word-break: inherit !important;">56</span>, upscaling_steps=<span style="box-sizing: border-box;font-size: inherit;color: rgb(174, 135, 250);line-height: inherit;word-wrap: inherit !important;word-break: inherit !important;">12</span>, upscaling_factor=<span style="box-sizing: border-box;font-size: inherit;color: rgb(174, 135, 250);line-height: inherit;word-wrap: inherit !important;word-break: inherit !important;">1.2</span>):<br style="box-sizing: border-box;font-size: inherit;color: inherit;line-height: inherit;word-wrap: inherit !important;word-break: inherit !important;" /> self.size, self.upscaling_steps, self.upscaling_factor = size, upscaling_steps, upscaling_factor<br style="box-sizing: border-box;font-size: inherit;color: inherit;line-height: inherit;word-wrap: inherit !important;word-break: inherit !important;" /> self.model = vgg16(pre=True).cuda().eval()<br style="box-sizing: border-box;font-size: inherit;color: inherit;line-height: inherit;word-wrap: inherit !important;word-break: inherit !important;" /> set_trainable(self.model, False)<br style="box-sizing: border-box;font-size: inherit;color: inherit;line-height: inherit;word-wrap: inherit !important;word-break: inherit !important;" /><br style="box-sizing: border-box;font-size: inherit;color: inherit;line-height: inherit;word-wrap: inherit !important;word-break: inherit !important;" /> def visualize(self, layer, filter, lr=<span style="box-sizing: border-box;font-size: inherit;color: rgb(174, 135, 250);line-height: inherit;word-wrap: inherit !important;word-break: inherit !important;">0.1</span>, opt_steps=<span style="box-sizing: border-box;font-size: inherit;color: rgb(174, 135, 250);line-height: inherit;word-wrap: inherit !important;word-break: inherit !important;">20</span>, blur=None):<br style="box-sizing: border-box;font-size: inherit;color: inherit;line-height: inherit;word-wrap: inherit !important;word-break: inherit !important;" /> sz = self.size<br style="box-sizing: border-box;font-size: inherit;color: inherit;line-height: inherit;word-wrap: inherit !important;word-break: inherit !important;" /> img = np.uint8(np.random.uniform(<span style="box-sizing: border-box;font-size: inherit;color: rgb(174, 135, 250);line-height: inherit;word-wrap: inherit !important;word-break: inherit !important;">150</span>, <span style="box-sizing: border-box;font-size: inherit;color: rgb(174, 135, 250);line-height: inherit;word-wrap: inherit !important;word-break: inherit !important;">180</span>, (sz, sz, <span style="box-sizing: border-box;font-size: inherit;color: rgb(174, 135, 250);line-height: inherit;word-wrap: inherit !important;word-break: inherit !important;">3</span>)))/<span style="box-sizing: border-box;font-size: inherit;color: rgb(174, 135, 250);line-height: inherit;word-wrap: inherit !important;word-break: inherit !important;">255</span> # generate random image<br style="box-sizing: border-box;font-size: inherit;color: inherit;line-height: inherit;word-wrap: inherit !important;word-break: inherit !important;" /> activations = SaveFeatures(list(self.model.children())[layer]) # register hook<br style="box-sizing: border-box;font-size: inherit;color: inherit;line-height: inherit;word-wrap: inherit !important;word-break: inherit !important;" /><br style="box-sizing: border-box;font-size: inherit;color: inherit;line-height: inherit;word-wrap: inherit !important;word-break: inherit !important;" /> <span style="box-sizing: border-box;font-size: inherit;color: rgb(248, 35, 117);line-height: inherit;word-wrap: inherit !important;word-break: inherit !important;">for</span> _ <span style="box-sizing: border-box;font-size: inherit;color: rgb(248, 35, 117);line-height: inherit;word-wrap: inherit !important;word-break: inherit !important;">in</span> range(self.upscaling_steps): # scale the image up upscaling_steps times<br style="box-sizing: border-box;font-size: inherit;color: inherit;line-height: inherit;word-wrap: inherit !important;word-break: inherit !important;" /> train_tfms, val_tfms = tfms_from_model(vgg16, sz)<br style="box-sizing: border-box;font-size: inherit;color: inherit;line-height: inherit;word-wrap: inherit !important;word-break: inherit !important;" /> img_var = V(val_tfms(img)[None], requires_grad=True) # convert image to Variable that requires grad<br style="box-sizing: border-box;font-size: inherit;color: inherit;line-height: inherit;word-wrap: inherit !important;word-break: inherit !important;" /> optimizer = torch.optim.Adam([img_var], lr=lr, weight_decay=<span style="box-sizing: border-box;font-size: inherit;color: rgb(174, 135, 250);line-height: inherit;word-wrap: inherit !important;word-break: inherit !important;">1e-6</span>)<br style="box-sizing: border-box;font-size: inherit;color: inherit;line-height: inherit;word-wrap: inherit !important;word-break: inherit !important;" /> <span style="box-sizing: border-box;font-size: inherit;color: rgb(248, 35, 117);line-height: inherit;word-wrap: inherit !important;word-break: inherit !important;">for</span> n <span style="box-sizing: border-box;font-size: inherit;color: rgb(248, 35, 117);line-height: inherit;word-wrap: inherit !important;word-break: inherit !important;">in</span> range(opt_steps): # optimize pixel values <span style="box-sizing: border-box;font-size: inherit;color: rgb(248, 35, 117);line-height: inherit;word-wrap: inherit !important;word-break: inherit !important;">for</span> opt_steps times<br style="box-sizing: border-box;font-size: inherit;color: inherit;line-height: inherit;word-wrap: inherit !important;word-break: inherit !important;" /> optimizer.zero_grad()<br style="box-sizing: border-box;font-size: inherit;color: inherit;line-height: inherit;word-wrap: inherit !important;word-break: inherit !important;" /> self.model(img_var)<br style="box-sizing: border-box;font-size: inherit;color: inherit;line-height: inherit;word-wrap: inherit !important;word-break: inherit !important;" /> loss = -activations.features[<span style="box-sizing: border-box;font-size: inherit;color: rgb(174, 135, 250);line-height: inherit;word-wrap: inherit !important;word-break: inherit !important;">0</span>, filter].mean()<br style="box-sizing: border-box;font-size: inherit;color: inherit;line-height: inherit;word-wrap: inherit !important;word-break: inherit !important;" /> loss.backward()<br style="box-sizing: border-box;font-size: inherit;color: inherit;line-height: inherit;word-wrap: inherit !important;word-break: inherit !important;" /> optimizer.step()<br style="box-sizing: border-box;font-size: inherit;color: inherit;line-height: inherit;word-wrap: inherit !important;word-break: inherit !important;" /> img = val_tfms.denorm(img_var.data.cpu().numpy()[<span style="box-sizing: border-box;font-size: inherit;color: rgb(174, 135, 250);line-height: inherit;word-wrap: inherit !important;word-break: inherit !important;">0</span>].transpose(<span style="box-sizing: border-box;font-size: inherit;color: rgb(174, 135, 250);line-height: inherit;word-wrap: inherit !important;word-break: inherit !important;">1</span>,<span style="box-sizing: border-box;font-size: inherit;color: rgb(174, 135, 250);line-height: inherit;word-wrap: inherit !important;word-break: inherit !important;">2</span>,<span style="box-sizing: border-box;font-size: inherit;color: rgb(174, 135, 250);line-height: inherit;word-wrap: inherit !important;word-break: inherit !important;">0</span>))<br style="box-sizing: border-box;font-size: inherit;color: inherit;line-height: inherit;word-wrap: inherit !important;word-break: inherit !important;" /> self.output = img<br style="box-sizing: border-box;font-size: inherit;color: inherit;line-height: inherit;word-wrap: inherit !important;word-break: inherit !important;" /> sz = int(self.upscaling_factor * sz) # calculate <span style="box-sizing: border-box;font-size: inherit;color: rgb(248, 35, 117);line-height: inherit;word-wrap: inherit !important;word-break: inherit !important;">new</span> image size<br style="box-sizing: border-box;font-size: inherit;color: inherit;line-height: inherit;word-wrap: inherit !important;word-break: inherit !important;" /> img = cv2.resize(img, (sz, sz), interpolation = cv2.INTER_CUBIC) # scale image up<br style="box-sizing: border-box;font-size: inherit;color: inherit;line-height: inherit;word-wrap: inherit !important;word-break: inherit !important;" /> <span style="box-sizing: border-box;font-size: inherit;color: rgb(248, 35, 117);line-height: inherit;word-wrap: inherit !important;word-break: inherit !important;">if</span> blur is not None: img = cv2.blur(img,(blur,blur)) # blur image to reduce high frequency patterns<br style="box-sizing: border-box;font-size: inherit;color: inherit;line-height: inherit;word-wrap: inherit !important;word-break: inherit !important;" /> self.save(layer, filter)<br style="box-sizing: border-box;font-size: inherit;color: inherit;line-height: inherit;word-wrap: inherit !important;word-break: inherit !important;" /> activations.close()<br style="box-sizing: border-box;font-size: inherit;color: inherit;line-height: inherit;word-wrap: inherit !important;word-break: inherit !important;" /><br style="box-sizing: border-box;font-size: inherit;color: inherit;line-height: inherit;word-wrap: inherit !important;word-break: inherit !important;" /> def save(self, layer, filter):<br style="box-sizing: border-box;font-size: inherit;color: inherit;line-height: inherit;word-wrap: inherit !important;word-break: inherit !important;" /> plt.imsave(<span style="box-sizing: border-box;font-size: inherit;color: rgb(238, 220, 112);line-height: inherit;word-wrap: inherit !important;word-break: inherit !important;">"layer_"</span>+str(layer)+<span style="box-sizing: border-box;font-size: inherit;color: rgb(238, 220, 112);line-height: inherit;word-wrap: inherit !important;word-break: inherit !important;">"_filter_"</span>+str(filter)+<span style="box-sizing: border-box;font-size: inherit;color: rgb(238, 220, 112);line-height: inherit;word-wrap: inherit !important;word-break: inherit !important;">".jpg"</span>, np.clip(self.output, <span style="box-sizing: border-box;font-size: inherit;color: rgb(174, 135, 250);line-height: inherit;word-wrap: inherit !important;word-break: inherit !important;">0</span>, <span style="box-sizing: border-box;font-size: inherit;color: rgb(174, 135, 250);line-height: inherit;word-wrap: inherit !important;word-break: inherit !important;">1</span>))</section><section style="box-sizing: border-box;padding: 0.5em;font-size: 14px;color: rgb(169, 183, 198);line-height: 18px;border-radius: 0px;background: rgb(40, 43, 46);font-family: Consolas, Inconsolata, Courier, monospace;display: block;overflow-x: auto;letter-spacing: 0px;margin-left: 8px;margin-right: 8px;overflow-wrap: normal !important;word-break: normal !important;overflow-y: auto !important;">layer = <span style="box-sizing: border-box;font-size: inherit;color: rgb(174, 135, 250);line-height: inherit;word-wrap: inherit !important;word-break: inherit !important;">40</span><br style="box-sizing: border-box;font-size: inherit;color: inherit;line-height: inherit;word-wrap: inherit !important;word-break: inherit !important;" />filter = <span style="box-sizing: border-box;font-size: inherit;color: rgb(174, 135, 250);line-height: inherit;word-wrap: inherit !important;word-break: inherit !important;">265</span><br style="box-sizing: border-box;font-size: inherit;color: inherit;line-height: inherit;word-wrap: inherit !important;word-break: inherit !important;" />FV = FilterVisualizer(size=<span style="box-sizing: border-box;font-size: inherit;color: rgb(174, 135, 250);line-height: inherit;word-wrap: inherit !important;word-break: inherit !important;">56</span>, upscaling_steps=<span style="box-sizing: border-box;font-size: inherit;color: rgb(174, 135, 250);line-height: inherit;word-wrap: inherit !important;word-break: inherit !important;">12</span>, upscaling_factor=<span style="box-sizing: border-box;font-size: inherit;color: rgb(174, 135, 250);line-height: inherit;word-wrap: inherit !important;word-break: inherit !important;">1.2</span>)<br style="box-sizing: border-box;font-size: inherit;color: inherit;line-height: inherit;word-wrap: inherit !important;word-break: inherit !important;" />FV.visualize(layer, filter, blur=<span style="box-sizing: border-box;font-size: inherit;color: rgb(174, 135, 250);line-height: inherit;word-wrap: inherit !important;word-break: inherit !important;">5</span>)</section><section data-brushtype="text" style="padding-right: 0em;padding-left: 0em;white-space: normal;letter-spacing: 0.544px;color: rgb(62, 62, 62);font-family: "Helvetica Neue", Helvetica, "Hiragino Sans GB", "Microsoft YaHei", Arial, sans-serif;widows: 1;word-spacing: 2px;caret-color: rgb(255, 0, 0);text-align: center;"><strong style="color: rgb(0, 0, 0);font-family: -apple-system-font, system-ui, "Helvetica Neue", "PingFang SC", "Hiragino Sans GB", "Microsoft YaHei UI", "Microsoft YaHei", Arial, sans-serif;letter-spacing: 0.544px;"><span style="letter-spacing: 0.5px;font-size: 14px;"><strong style="font-size: 16px;letter-spacing: 0.544px;"><span style="letter-spacing: 0.5px;">—</span></strong>完<strong style="font-size: 16px;letter-spacing: 0.544px;"><span style="letter-spacing: 0.5px;font-size: 14px;"><strong style="font-size: 16px;letter-spacing: 0.544px;"><span style="letter-spacing: 0.5px;">—</span></strong></span></strong></span></strong></section><pre><pre><section style="letter-spacing: 0.544px;white-space: normal;font-family: -apple-system-font, system-ui, "Helvetica Neue", "PingFang SC", "Hiragino Sans GB", "Microsoft YaHei UI", "Microsoft YaHei", Arial, sans-serif;"><section powered-by="xiumi.us"><section style="margin-top: 15px;margin-bottom: 25px;opacity: 0.8;"><section><section style="letter-spacing: 0.544px;"><section powered-by="xiumi.us"><section style="margin-top: 15px;margin-bottom: 25px;opacity: 0.8;"><section><section style="margin-bottom: 15px;padding-right: 0em;padding-left: 0em;color: rgb(127, 127, 127);font-size: 12px;font-family: sans-serif;line-height: 25.5938px;letter-spacing: 3px;text-align: center;"><span style="color: rgb(0, 0, 0);"><strong><span style="font-size: 16px;font-family: 微软雅黑;caret-color: red;">为您推荐</span></strong></span></section><p style="margin: 5px 16px;padding-right: 0em;padding-left: 0em;font-family: sans-serif;letter-spacing: 0px;opacity: 0.8;line-height: normal;text-align: center;">深度学习框架简史:未来十年迎来黄金时期<br /></p><section style="margin-top: 5px;margin-bottom: 5px;padding-right: 0em;padding-left: 0em;min-height: 1em;font-family: sans-serif;letter-spacing: 0px;opacity: 0.8;line-height: normal;text-align: center;">吃透空洞卷积(Dilated Convolutions)<br /></section><section style="margin-top: 5px;margin-bottom: 5px;padding-right: 0em;padding-left: 0em;min-height: 1em;font-family: sans-serif;letter-spacing: 0px;opacity: 0.8;line-height: normal;text-align: center;"><span style="font-size: 14px;">13个算法工程师必须掌握的PyTorch Tricks</span></section><section style="margin-top: 5px;margin-bottom: 5px;padding-right: 0em;padding-left: 0em;min-height: 1em;font-family: sans-serif;letter-spacing: 0px;opacity: 0.8;line-height: normal;text-align: center;"><span style="font-size: 14px;">吴恩达上新:生成对抗网络(GAN)专项课程</span></section><section style="margin-top: 5px;margin-bottom: 5px;padding-right: 0em;padding-left: 0em;min-height: 1em;font-family: sans-serif;letter-spacing: 0px;opacity: 0.8;line-height: normal;text-align: center;">从SGD到NadaMax,十种优化算法原理及实现</section></section></section></section></section></section></section></section></section>本篇文章来源于: 深度学习这件小事
本文为原创文章,版权归知行编程网所有,欢迎分享本文,转载请保留出处!


内容反馈