转自 | 新智元 来源 | towardsdatascience
作者 | Raimi Karim 编辑 | 肖琴
【导读】NLP领域最近的快速进展离不开基于Transformer的架构,本文以图解+代码的形式,带领读者完全理解self-attention机制及其背后的数学原理,并扩展到Transformer。
BERT, RoBERTa, ALBERT, SpanBERT, DistilBERT, SesameBERT, SemBERT, MobileBERT, TinyBERT, CamemBERT……它们有什么共同之处呢?答案不是“它们都是BERT”🤭。
正确答案是:self-attention🤗。
我们讨论的不仅是名为“BERT”的架构,更准确地说是基于Transformer的架构。基于Transformer的架构主要用于建模语言理解任务,它避免了在神经网络中使用递归,而是完全依赖于self-attention机制来绘制输入和输出之间的全局依赖关系。但这背后的数学原理是什么呢?
这就是本文要讲的内容。这篇文章将带你通过一个self-attention模块了解其中涉及的数学运算。读完本文,你将能够从头开始写一个self-attention模块。
让我们开始吧!
完全图解——8步掌握self-attention
self-attention是什么?
如果你认为self-attention与attention有相似之处,那么答案是肯定的!它们基本上共享相同的概念和许多常见的数学运算。
一个self-attention模块接收n个输入,然后返回n个输出。这个模块中发生了什么呢?用外行人的话说,self-attention机制允许输入与输入之间彼此交互(“self”),并找出它们应该更多关注的对象(“attention”)。输出是这些交互和注意力得分的总和。
写一个self-attention模块包括以下步骤
-
准备输入
-
初始化权重
-
推导key, query 和 value
-
计算输入1的注意力得分
-
计算softmax
-
将分数与值相乘
-
将权重值相加,得到输出1
-
对输入2和输入3重复步骤4-7
注:实际上,数学运算是矢量化的,,即所有的输入都一起经历数学运算。在后面的代码部分中可以看到这一点。
步骤1:准备输入
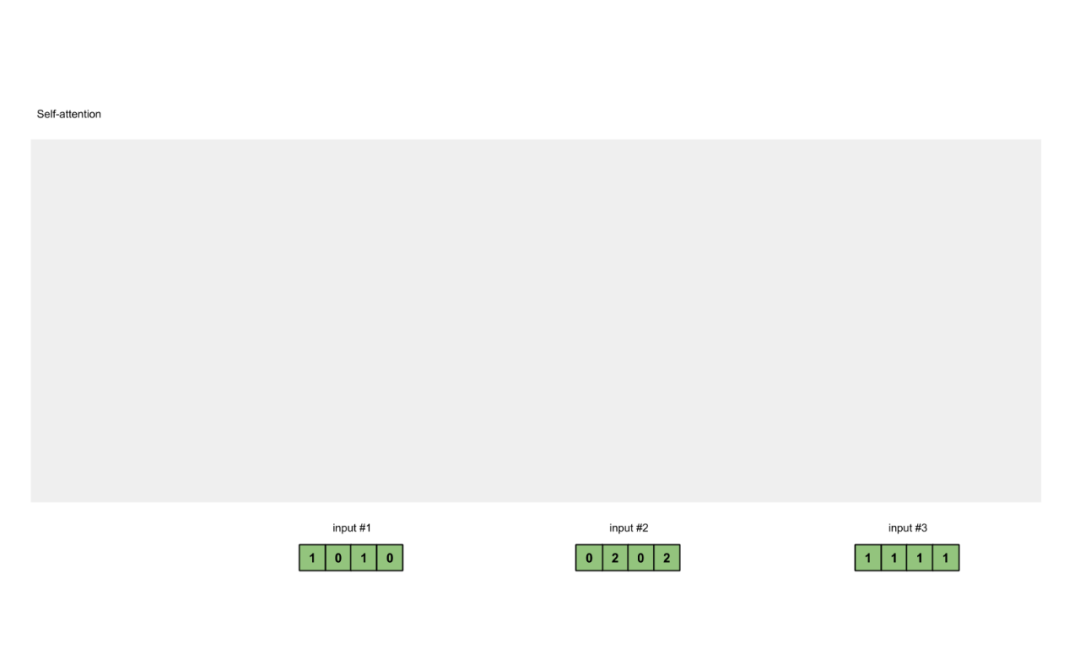
图1.1: 准备输入
在本教程中,我们从3个输入开始,每个输入的维数为4。

步骤2:初始化权重
每个输入必须有三个表示(见下图)。这些表示称为键(key,橙色)、查询(query,红色)和值(value,紫色)。在本例中,我们假设这些表示的维数是3。因为每个输入的维数都是4,这意味着每组权重必须是4×3。
注:
稍后我们将看到value的维度也是输出的维度。
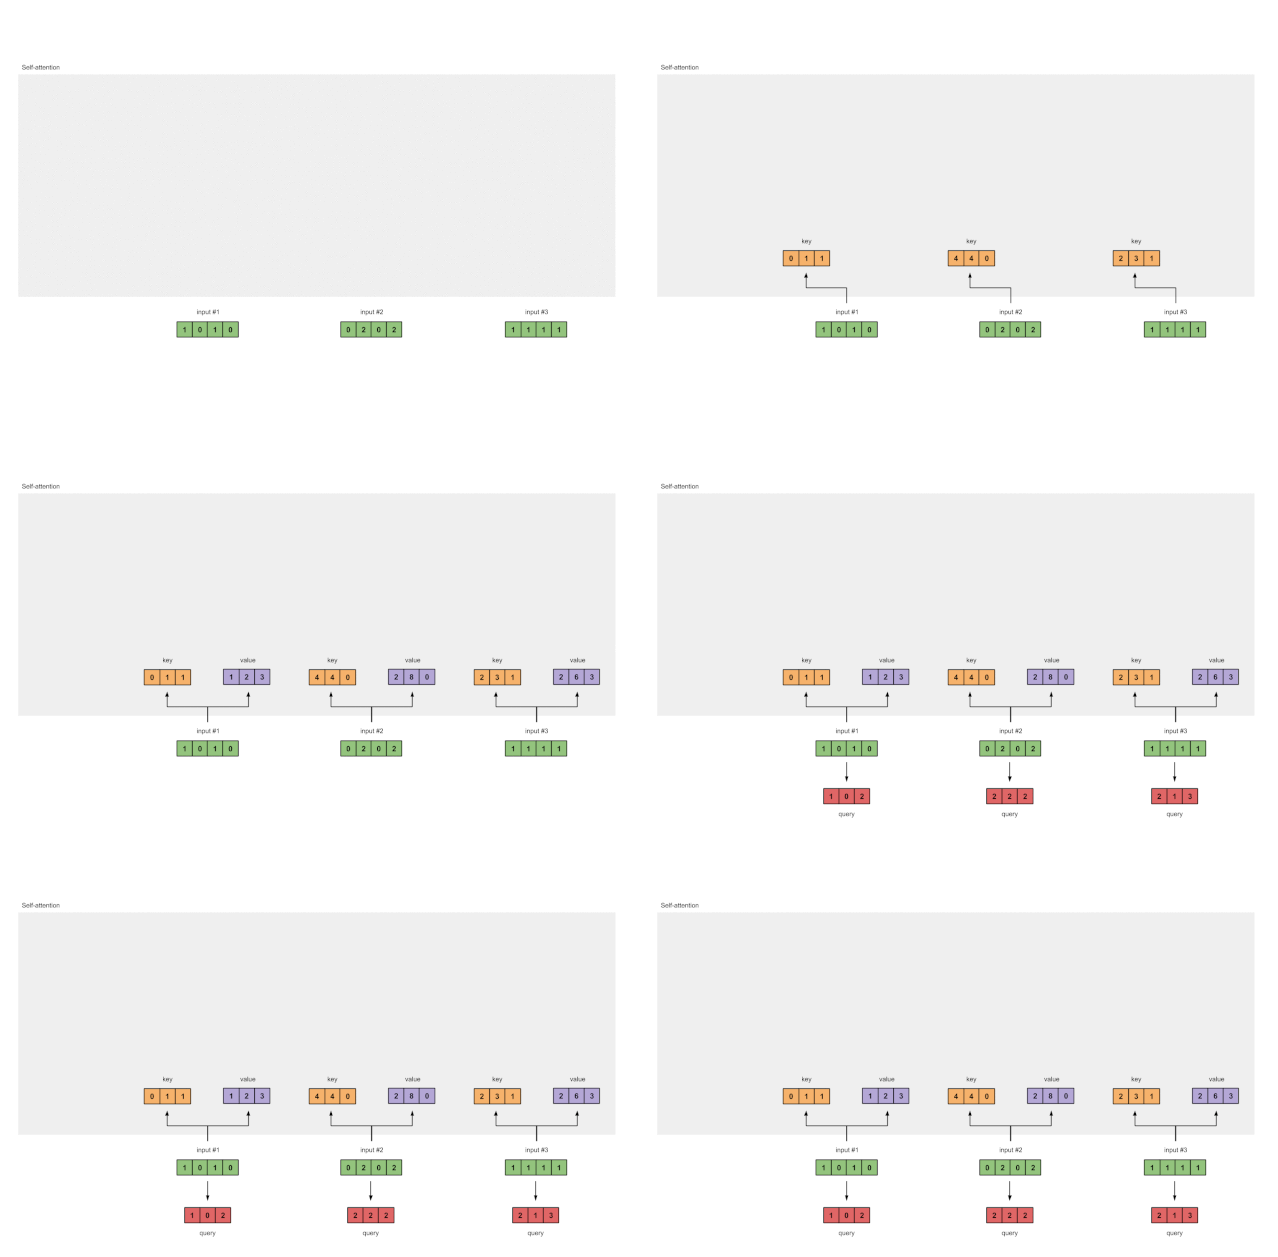
图1.2:从每个输入得出键、查询和值的表示
为了得到这些表示,每个输入(绿色)都乘以一组键的权重、一组查询的权重,以及一组值的权重。在本示例中,我们将三组权重“初始化”如下。
key的权重:

query的权重:

value的权重:

注:
在神经网络设置中,这些权重通常是很小的数字,使用适当的随机分布(例如高斯、Xavier和Kaiming分布)进行随机初始化。
步骤3:推导键、查询和值
现在,我们有了三组权重,让我们实际获取每个输入的键、查询和值表示。
输入1的键表示:

使用相同的权重集合得到输入2的键表示:

使用相同的权重集合得到输入3的键表示:

一种更快的方法是对上述操作进行矢量化:

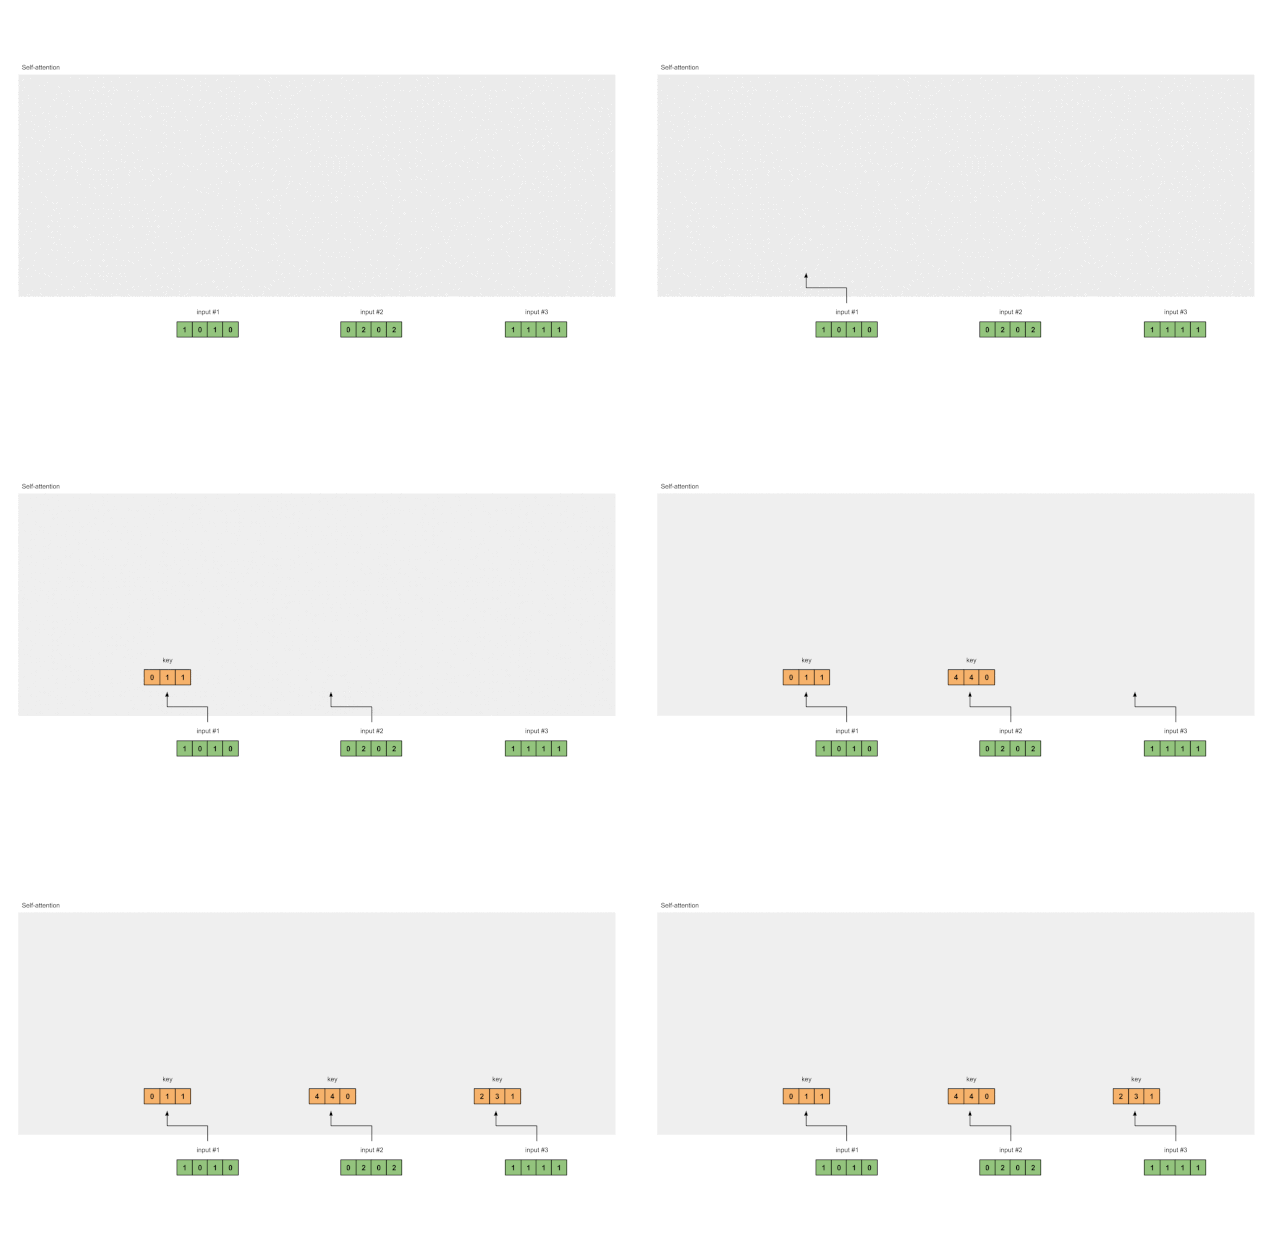
图1.3a:从每个输入推导出键表示
同样的方法,可以获取每个输入的值表示:

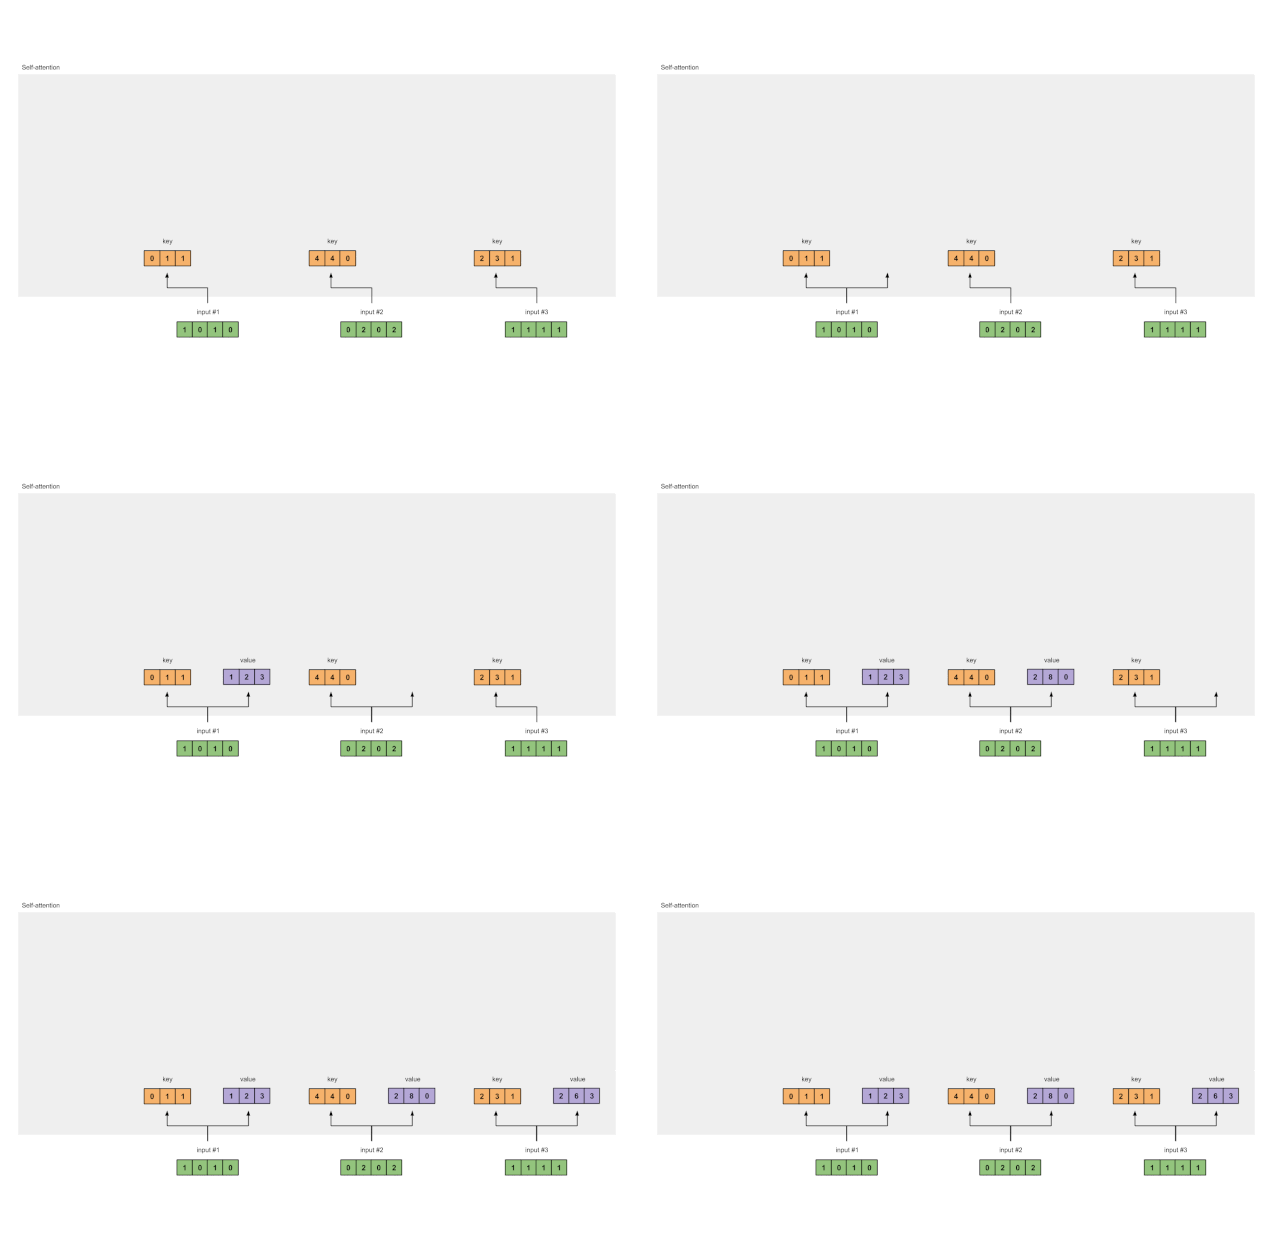
图1.3b:从每个输入推导出值表示
最后,得到查询表示

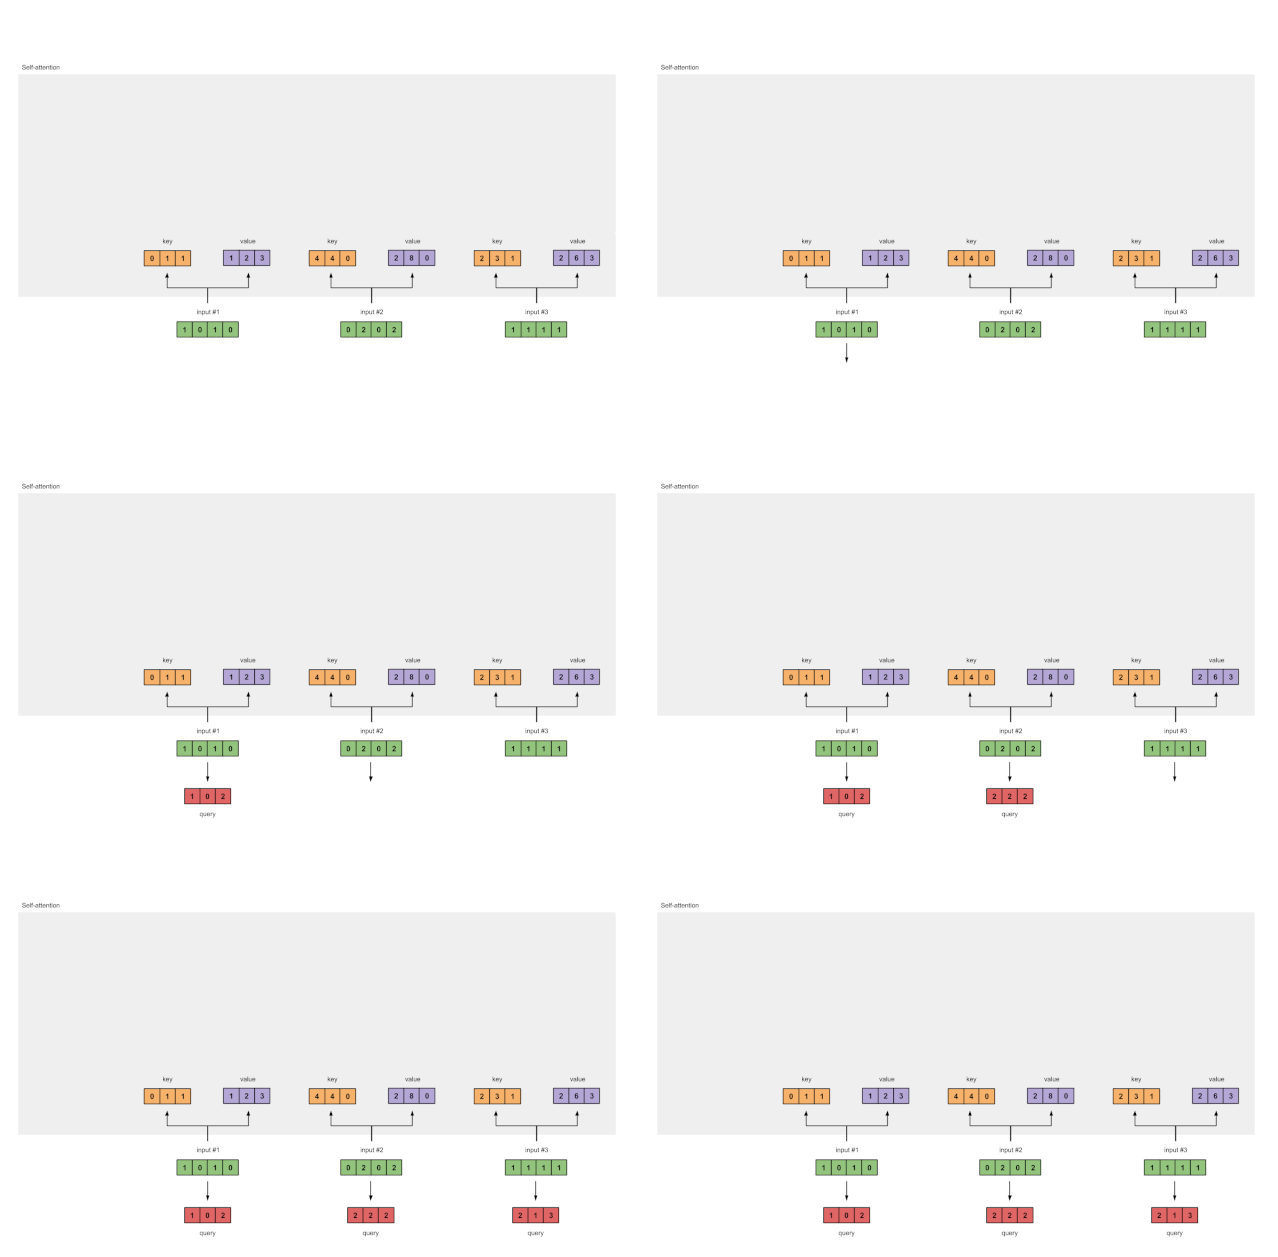
图1.3b:从每个输入推导出查询表示
注:
在实践中,偏差向量(bias vector )可以添加到矩阵乘法的乘积。
步骤4:计算输入1的attention scores
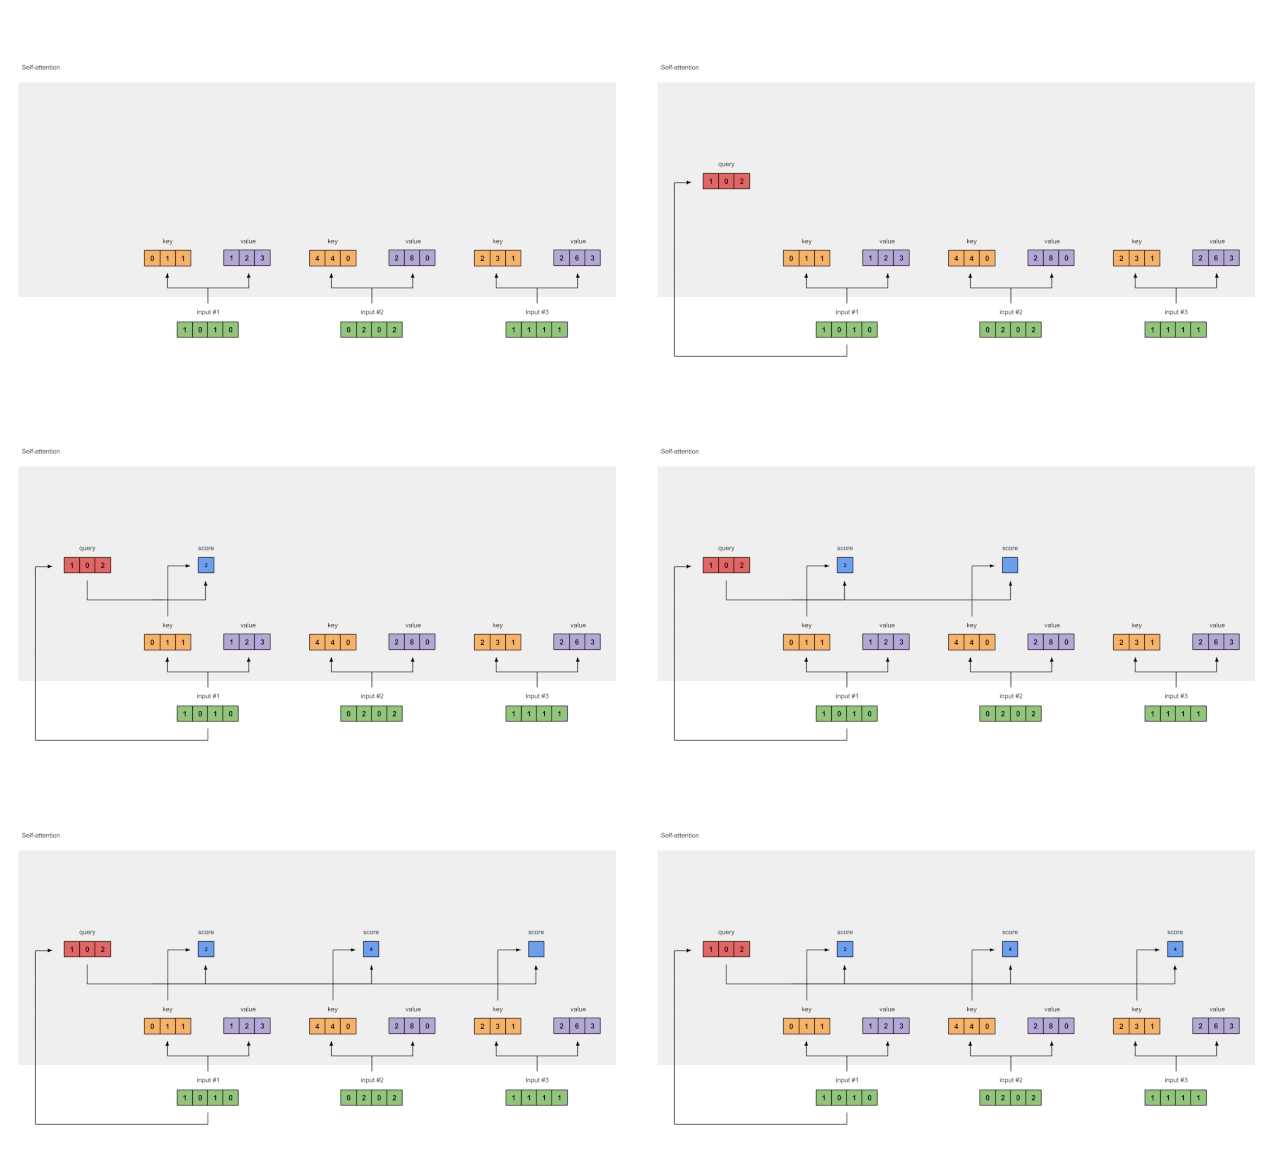
图1.4:从查询1中计算注意力得分(蓝色)
为了获得注意力得分,我们首先在输入1的查询(红色)和所有键(橙色)之间取一个点积。因为有3个键表示(因为有3个输入),我们得到3个注意力得分(蓝色)。

注:现在只使用Input 1中的查询。稍后,我们将对其他查询重复相同的步骤。
步骤5:计算softmax
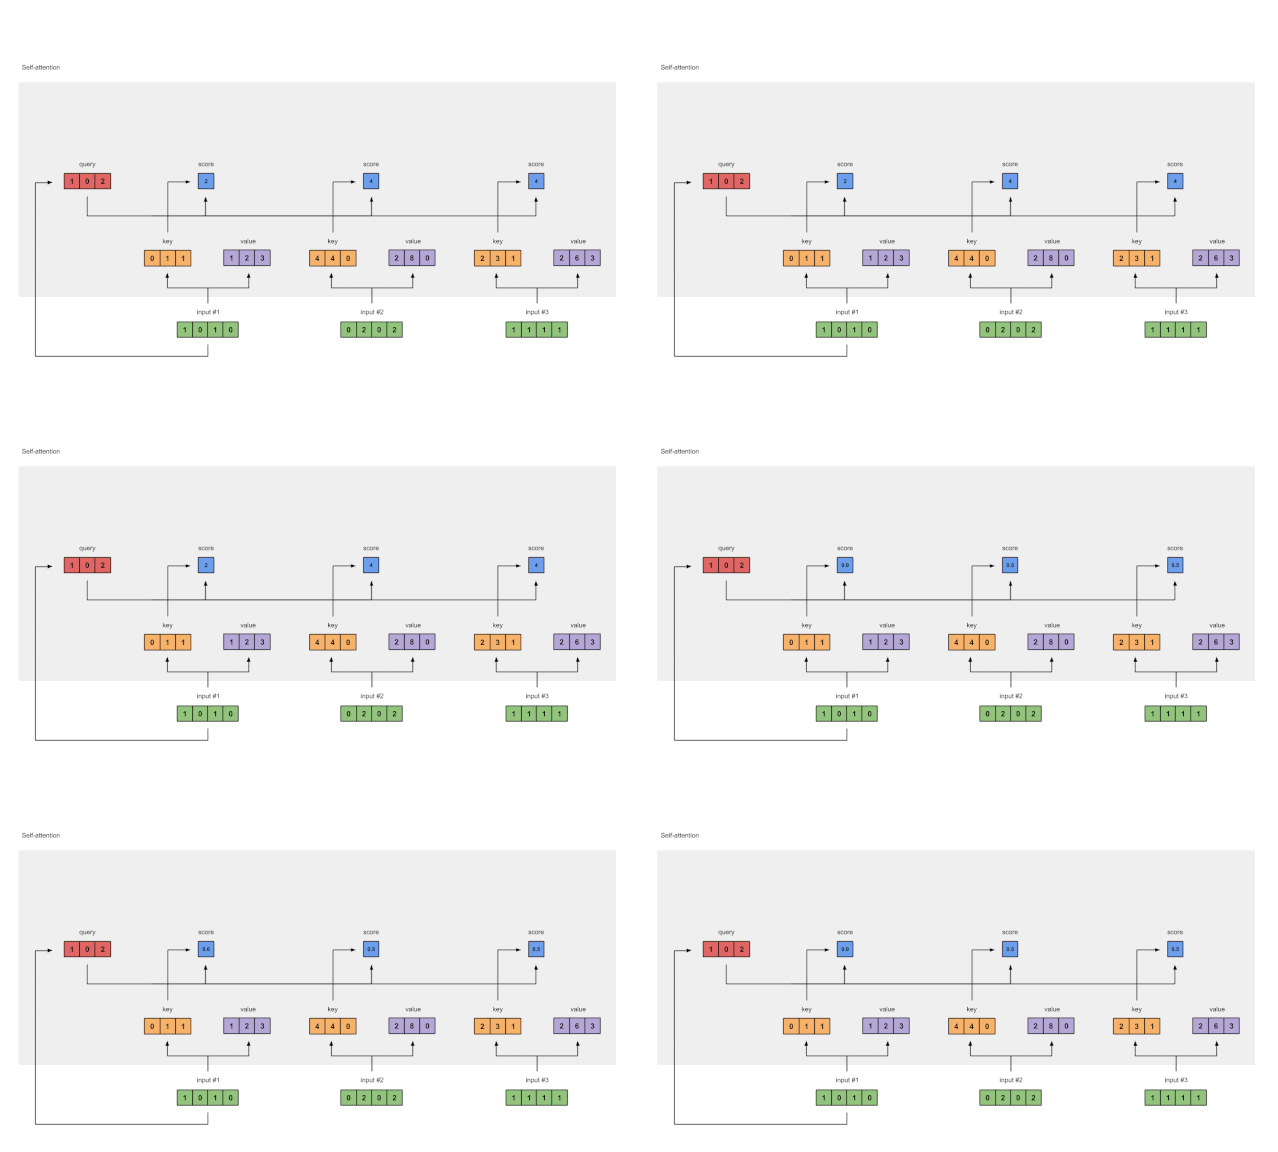
图1.5:Softmax注意力评分(蓝色)
在所有注意力得分中使用softmax(蓝色)。

步骤6:将得分和值相乘
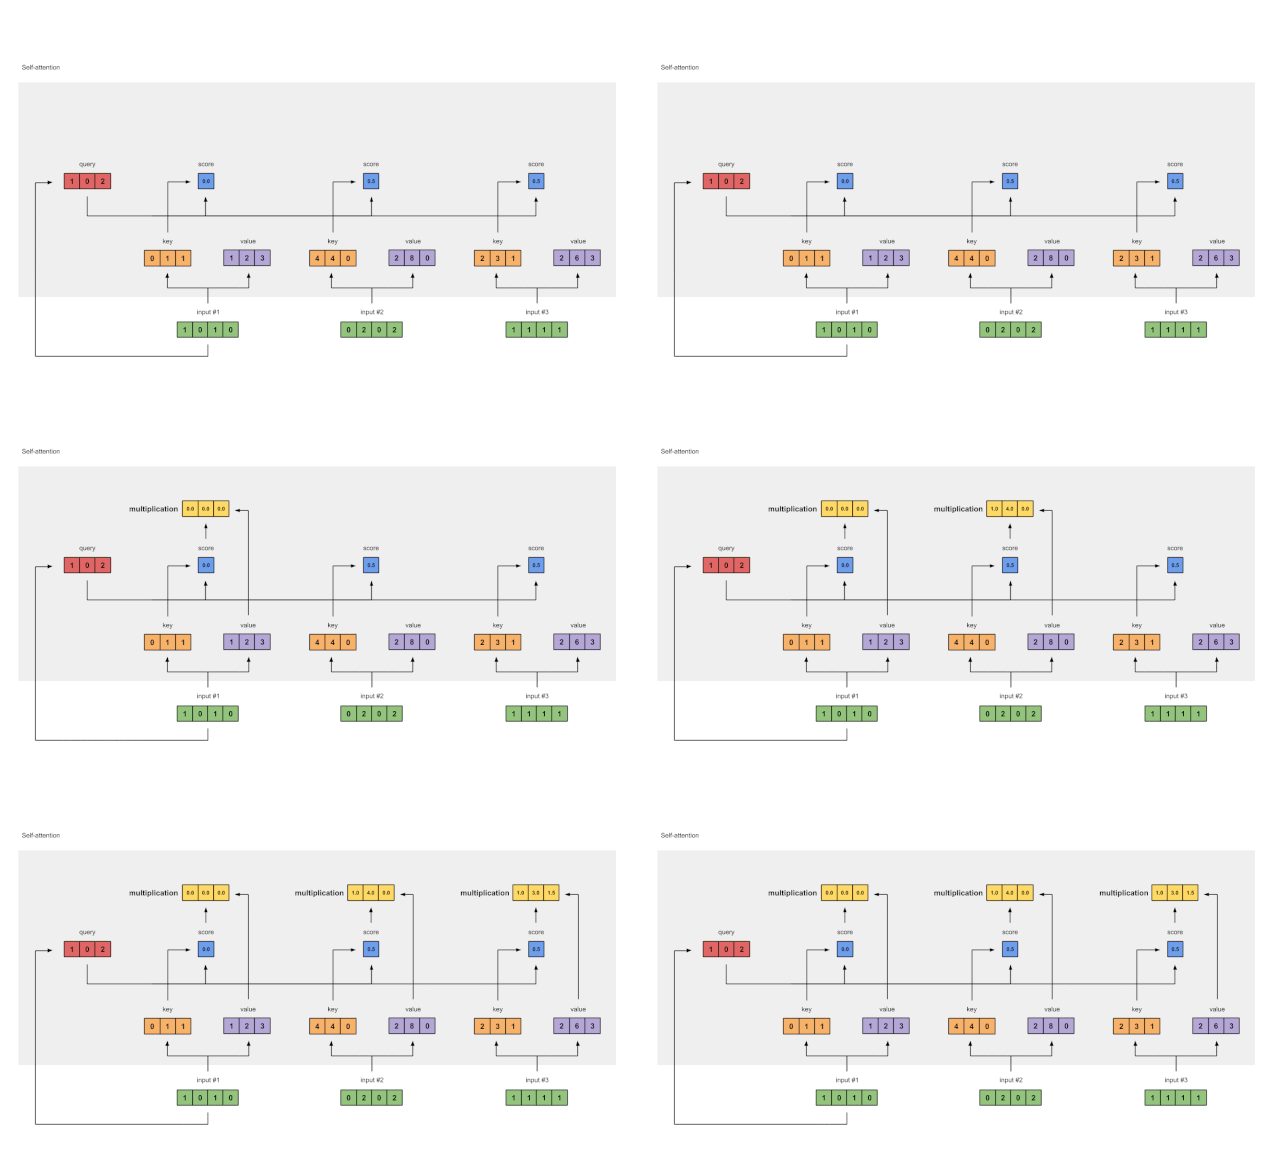
图1.6:由值(紫色)和分数(蓝色)的相乘推导出加权值表示(黄色)
每个输入的softmaxed attention 分数(蓝色)乘以相应的值(紫色)。结果得到3个对齐向量(黄色)。在本教程中,我们将它们称为加权值。

步骤7:将加权值相加得到输出1
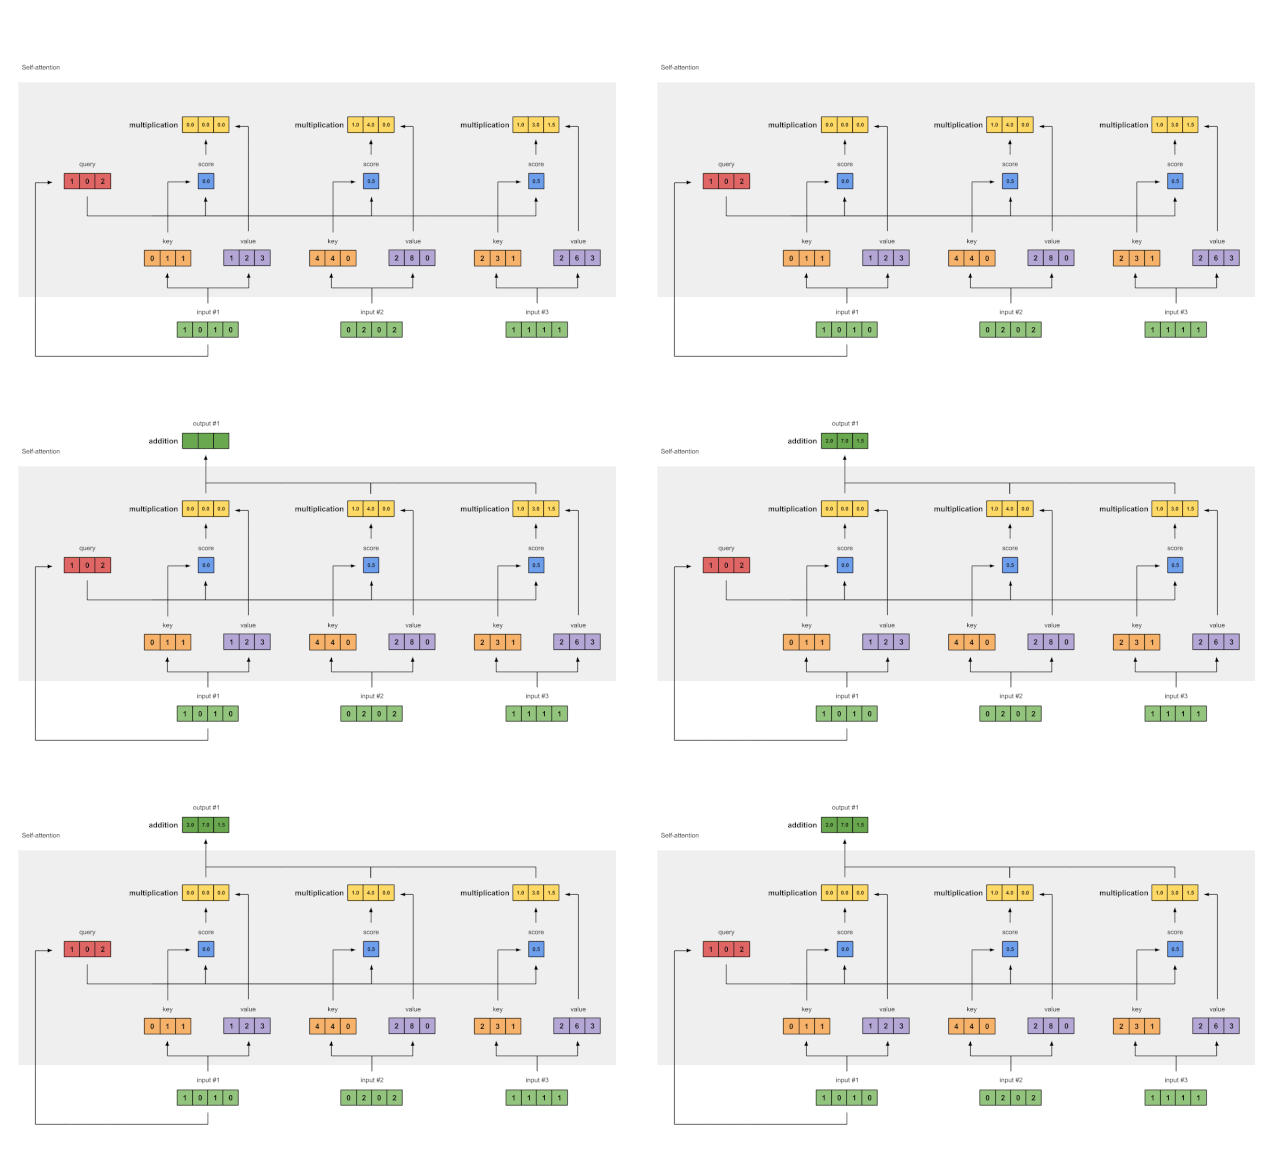
图1.7:将所有加权值(黄色)相加,得到输出1(深绿色)
将所有加权值(黄色)按元素指向求和:

结果向量[2.0,7.0,1.5](深绿色)是输出1,该输出基于输入1与所有其他键(包括它自己)进行交互的查询表示。
步骤8:重复输入2和输入3
现在,我们已经完成了输出1,我们对输出2和输出3重复步骤4到7。接下来相信你可以自己操作了👍🏼。
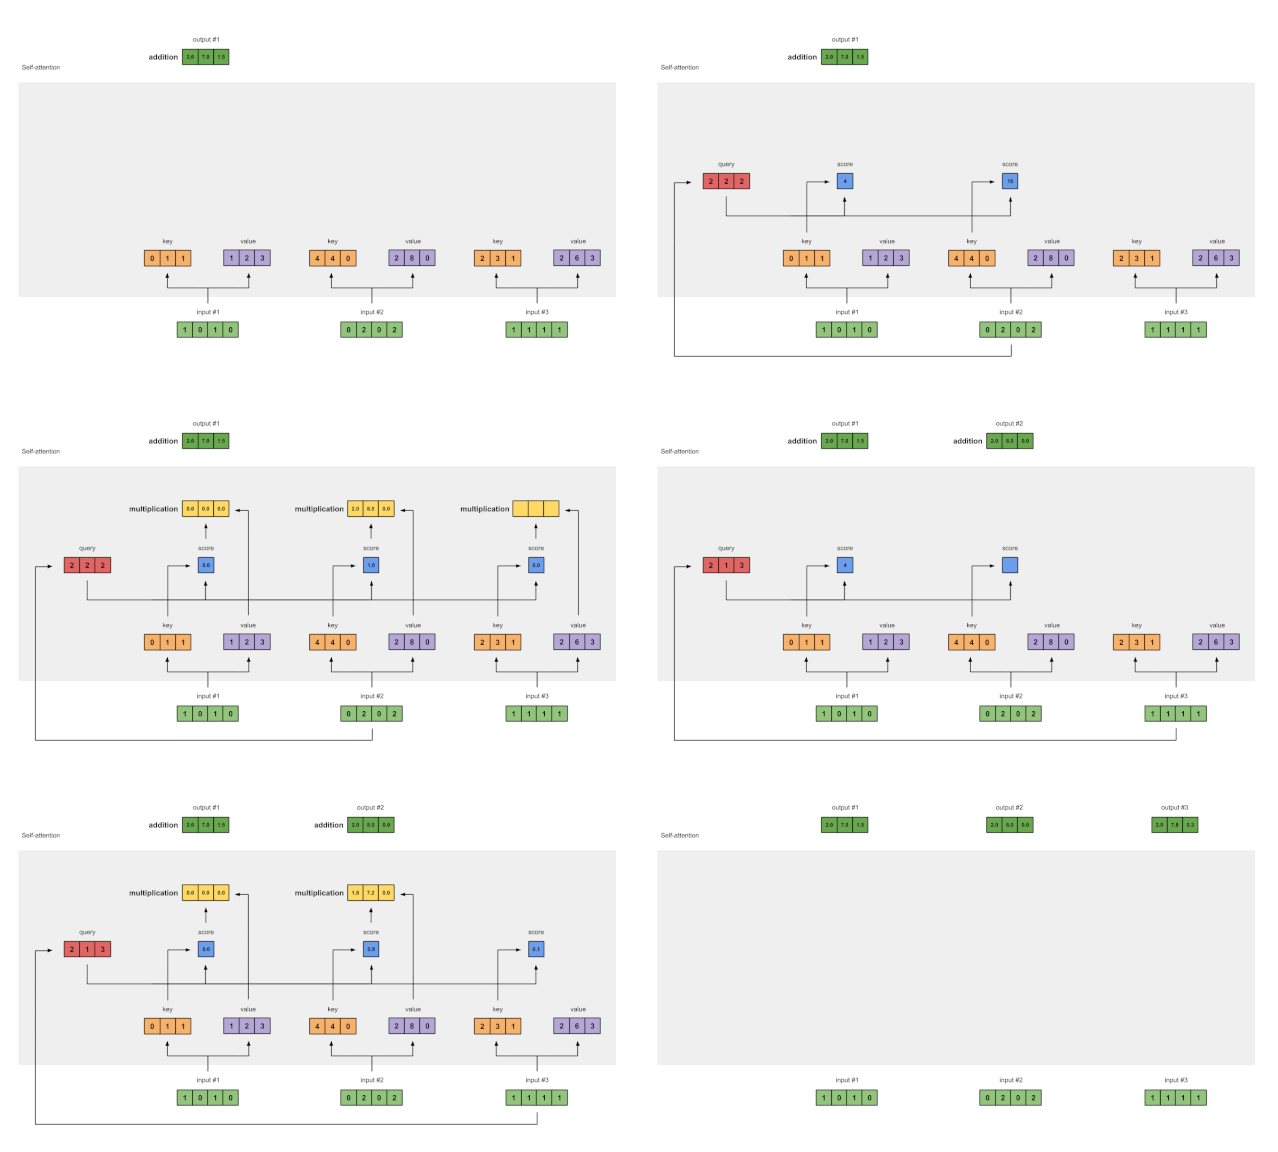
图1.8:对输入2和输入3重复前面的步骤
代码上手
这是PyTorch代码🤗,PyTorch是Python的一个流行的深度学习框架。
步骤1:准备输入
步骤2:初始化权重
步骤3: 推导键、查询和值
步骤4:计算注意力得分
步骤5:计算softmax
步骤6:将得分和值相乘
步骤7:求和加权值
扩展到Transformer
那么,接下来怎么办呢?Transformer!
的确,我们生活在一个深度学习研究和高计算资源的激动人心的时代。Transformer是Attention is All You Need里面提出的,最初用于执行神经机器翻译。研究人员在此基础上进行了重组、切割、添加和扩展,并将其应用到更多的语言任务中。
在这里,我将简要地介绍如何将self-attention扩展到Transformer架构。
在self-attention模块中:
-
Dimension
-
Bias
self-attention模块的输入:
-
Embedding module
-
Positional encoding
-
Truncating
-
Masking
增加更多的self-attention模块:
-
Multihead
-
Layer stacking
-
self-attention模块之间的模块:
-
Linear transformations
-
LayerNorm
这就是所有了!希望你觉得内容简单易懂。
参考文献:
Attention Is All You Need
https://arxiv.org/abs/1706.03762
The Illustrated Transformer
https://jalammar.github.io/illustrated-transformer/
<pre style="letter-spacing: 0.544px;"><section style="margin-right: 8px;margin-left: 8px;white-space: normal;color: rgb(0, 0, 0);font-family: -apple-system-font, system-ui, "Helvetica Neue", "PingFang SC", "Hiragino Sans GB", "Microsoft YaHei UI", "Microsoft YaHei", Arial, sans-serif;letter-spacing: 0.544px;text-align: center;widows: 1;line-height: 1.75em;"><br /></section><section style="margin-right: 8px;margin-left: 8px;white-space: normal;color: rgb(0, 0, 0);font-family: -apple-system-font, system-ui, "Helvetica Neue", "PingFang SC", "Hiragino Sans GB", "Microsoft YaHei UI", "Microsoft YaHei", Arial, sans-serif;letter-spacing: 0.544px;text-align: center;widows: 1;line-height: 1.75em;"><strong><span style="letter-spacing: 0.5px;font-size: 14px;"><strong style="font-size: 16px;letter-spacing: 0.544px;"><span style="letter-spacing: 0.5px;">—</span></strong>完<strong style="font-size: 16px;letter-spacing: 0.544px;"><span style="letter-spacing: 0.5px;font-size: 14px;"><strong style="font-size: 16px;letter-spacing: 0.544px;"><span style="letter-spacing: 0.5px;">—</span></strong></span></strong></span></strong></section><section style="white-space: normal;font-family: -apple-system-font, system-ui, "Helvetica Neue", "PingFang SC", "Hiragino Sans GB", "Microsoft YaHei UI", "Microsoft YaHei", Arial, sans-serif;letter-spacing: 0.544px;text-align: center;widows: 1;color: rgb(255, 97, 149);"><section powered-by="xiumi.us"><section style="margin-top: 15px;margin-bottom: 25px;opacity: 0.8;"><section><section style="letter-spacing: 0.544px;"><section powered-by="xiumi.us"><section style="margin-top: 15px;margin-bottom: 25px;opacity: 0.8;"><section><p style="margin-right: 8px;margin-bottom: 15px;margin-left: 8px;padding-right: 0em;padding-left: 0em;color: rgb(127, 127, 127);font-family: sans-serif;font-size: 12px;line-height: 25.5938px;letter-spacing: 3px;"><span style="color: rgb(0, 0, 0);"><strong><span style="font-size: 16px;font-family: 微软雅黑;caret-color: red;">为您推荐</span></strong></span></p><section style="margin-right: 8px;margin-bottom: 5px;margin-left: 8px;padding-right: 0em;padding-left: 0em;min-height: 1em;color: rgb(127, 127, 127);font-family: sans-serif;font-size: 12px;line-height: 1.75em;letter-spacing: 0px;">Deep Learning 调参经验<br /></section><section style="margin-right: 8px;margin-bottom: 5px;margin-left: 8px;padding-right: 0em;padding-left: 0em;min-height: 1em;color: rgb(127, 127, 127);font-family: sans-serif;font-size: 12px;line-height: 1.75em;letter-spacing: 0px;">作为 IT 行业的过来人,你有什么话想对后辈说的?<br /></section><section style="margin-right: 8px;margin-bottom: 5px;margin-left: 8px;padding-right: 0em;padding-left: 0em;min-height: 1em;color: rgb(127, 127, 127);font-family: sans-serif;font-size: 12px;line-height: 1.75em;letter-spacing: 0px;">程序员真的是太太太太太太太太难了!<br /></section><section style="margin-right: 8px;margin-bottom: 5px;margin-left: 8px;padding-right: 0em;padding-left: 0em;min-height: 1em;color: rgb(127, 127, 127);font-family: sans-serif;font-size: 12px;line-height: 1.75em;letter-spacing: 0px;">深度学习必懂的13种概率分布<br /></section><section style="margin-right: 8px;margin-bottom: 5px;margin-left: 8px;padding-right: 0em;padding-left: 0em;min-height: 1em;color: rgb(127, 127, 127);font-family: sans-serif;font-size: 12px;line-height: 1.75em;letter-spacing: 0px;">【微软】AI-神经网络基本原理简明教程</section></section></section></section></section></section></section></section></section>本篇文章来源于: 深度学习这件小事
本文为原创文章,版权归知行编程网所有,欢迎分享本文,转载请保留出处!


内容反馈